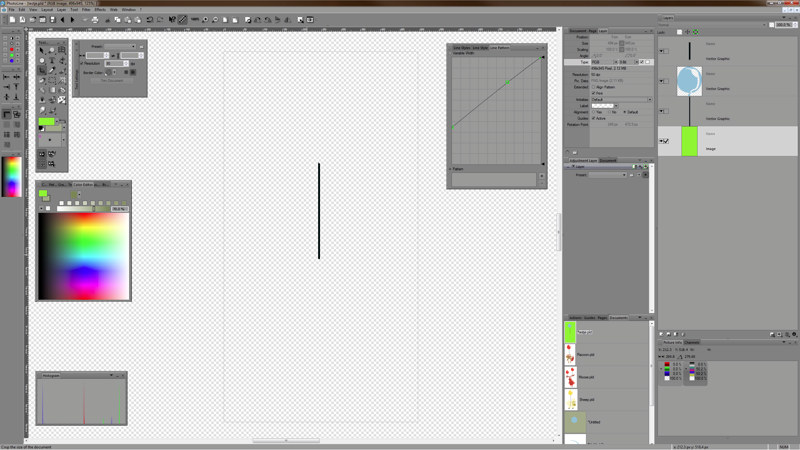
Bug:
1) create a vector stroke.
2) apply a good thickness: 50 px for example.
3) use the Line Pattern to change the variable width.
4) duplicate this layer virtually.
5) right-mouse click the virtual copy's eye icon, and choose "clip"
Expected result: a mask that is the same shape as the original stroke.
Actual Result: a mask that is a filled shape.
This also does not work correctly when the vector stroke is set to clip directly.
Neue Testversion 19.40b4
-
Herbert123

- Mitglied
- Beiträge: 2172
- Registriert: Sa 12 Mai 2012 21:38
Re: Neue Testversion 19.40b4
Du hast keine ausreichende Berechtigung, um die Dateianhänge dieses Beitrags anzusehen.
/*---------------------------------------------*/
System: Win10 64bit - i7 920@3.6Ghz, p6t Deluxe v1, 48gb (6x8gb RipjawsX), Nvidia GTX1080 8GB, Revodrive X2 240gb, e-mu 1820, 2XSamsung SA850 (2560*1440) and 1XHP2408H 1920*1200 portrait
System: Win10 64bit - i7 920@3.6Ghz, p6t Deluxe v1, 48gb (6x8gb RipjawsX), Nvidia GTX1080 8GB, Revodrive X2 240gb, e-mu 1820, 2XSamsung SA850 (2560*1440) and 1XHP2408H 1920*1200 portrait
-
Herbert123
- Mitglied
- Beiträge: 2172
- Registriert: Sa 12 Mai 2012 21:38
Re: Neue Testversion 19.40b4
Another strange one: I imported an Illustrator design, and all the colours are CMYK. The file opens in document mode.
When I add a transparent RGB image layer, place it at the bottom of the layer stack, and convert the document to picture mode, the entire design goes transparent, with only some of the black shapes still partly visible. Turning off transparency for this image layer restores the graphic. Switching to transparent again hides most of the shapes.
Saving the file or panning the view partly restores the image. There is some kind of view corruption going on.
I have attached an example file.
http://estructor.altervista.org/links/t1.jpg
http://estructor.altervista.org/links/t2.jpg
PS why is this forum software making it so hard to attach images? I tried to attach above images, which did not work. I uploaded them to my own server, and tried to use the img tag insert them: does not work either. ("your images may only be up to 640px wide" error).
So I am just providing the links to the ones on my server here.
Du hast keine ausreichende Berechtigung, um die Dateianhänge dieses Beitrags anzusehen.
Zuletzt geändert von Herbert123 am Fr 31 Jul 2015 21:48, insgesamt 1-mal geändert.
/*---------------------------------------------*/
System: Win10 64bit - i7 920@3.6Ghz, p6t Deluxe v1, 48gb (6x8gb RipjawsX), Nvidia GTX1080 8GB, Revodrive X2 240gb, e-mu 1820, 2XSamsung SA850 (2560*1440) and 1XHP2408H 1920*1200 portrait
System: Win10 64bit - i7 920@3.6Ghz, p6t Deluxe v1, 48gb (6x8gb RipjawsX), Nvidia GTX1080 8GB, Revodrive X2 240gb, e-mu 1820, 2XSamsung SA850 (2560*1440) and 1XHP2408H 1920*1200 portrait
-
Eurgail
- Mitglied
- Beiträge: 379
- Registriert: So 06 Jul 2014 23:02
Re: Neue Testversion 19.40b4
In your image the layer is not a virtual layer but the duplicated vector layer.Herbert123 hat geschrieben:Bug:
1) create a vector stroke.
2) apply a good thickness: 50 px for example.
3) use the Line Pattern to change the variable width.
4) duplicate this layer virtually.
5) right-mouse click the virtual copy's eye icon, and choose "clip"
Expected result: a mask that is the same shape as the original stroke.
Actual Result: a mask that is a filled shape.
This also does not work correctly when the vector stroke is set to clip directly.
That's not a bug, i think, but the way strokes are handled: The width of a stroke is never used for clipping, only the area. In your picture the starting point and endpoint are connected to get the area (closed vector path) and this is used for the clipping mask.
If you want to use this shape as mask you need to create the vector outline first.
-
Herbert123
- Mitglied
- Beiträge: 2172
- Registriert: Sa 12 Mai 2012 21:38
Re: Neue Testversion 19.40b4
Sorry for all these posts, but I am encountering a lot of workflow related things now that I am working with CMYK graphics that must be converted to RGB ones.
Issue: I have two objects, one CMYK, one RGB. I wish to use the color picker to apply the RGB colour to replace the CMYK colour. This does not work. Both colour values are supposedly identical, but the CMUK colour remains different. I turned off colour management. With colour management turned on, the colours display correctly. However, I still want to convert these colours more easily.
It would be handy if the CTRL modifier key, in combination with the color picker, would also change the colour model/space together with the actual colour.
But now I am encountering another issue: even when I specifically convert the first object (which is CMYK) to be an RGB colour with the color editor panel, and then use the color picker to have it set to the second (RGB) object's colour, the first one suddenly reverts back to CMYK!!!
I have linked to a sample document.
http://estructor.altervista.org/links/test2.pld
Steps to reproduce:
0) open the document. Turn off color management in preferences temporarily. With colour management on, the colours of shape 1 and 2 look identical on my screen. With color management turned off, they differ, and shape one looks more pinkish.
1) select Shape 1 (CMYK colour)
2) open the color editor panel (not the modal dialog) View-->Lists-->Color Editor
3) in the color editor, swich the shape 1 colour mode to RGB. The fill colour swatch in either the tools or color editor no longer display the CMYK indicator.
4) switch to the color picker (shape 1 must still be selected).
5) click on the colour of shape 2 (which is a RGB coloured shape!).
Result: the colour of shape 1 changes back to CMYK mode, and the colour does not change!!! WHAT?!
What is happening here? I do not understand it. The other way around does work - but I need shape 1 to be shape 2's colour, not vice versa.
/*---------------------------------------------*/
System: Win10 64bit - i7 920@3.6Ghz, p6t Deluxe v1, 48gb (6x8gb RipjawsX), Nvidia GTX1080 8GB, Revodrive X2 240gb, e-mu 1820, 2XSamsung SA850 (2560*1440) and 1XHP2408H 1920*1200 portrait
System: Win10 64bit - i7 920@3.6Ghz, p6t Deluxe v1, 48gb (6x8gb RipjawsX), Nvidia GTX1080 8GB, Revodrive X2 240gb, e-mu 1820, 2XSamsung SA850 (2560*1440) and 1XHP2408H 1920*1200 portrait
-
Herbert123
- Mitglied
- Beiträge: 2172
- Registriert: Sa 12 Mai 2012 21:38
Re: Neue Testversion 19.40b4
Yes, I posted a screenshot without the virtual layer version. However, even with a virtual layer, it still does not work correctly. I understand that a workaround is to convert the stroke to an outline (which I did), but then I lose the option to edit that stroke later.Eurgail hat geschrieben:In your image the layer is not a virtual layer but the duplicated vector layer.Herbert123 hat geschrieben:Bug:
1) create a vector stroke.
2) apply a good thickness: 50 px for example.
3) use the Line Pattern to change the variable width.
4) duplicate this layer virtually.
5) right-mouse click the virtual copy's eye icon, and choose "clip"
Expected result: a mask that is the same shape as the original stroke.
Actual Result: a mask that is a filled shape.
This also does not work correctly when the vector stroke is set to clip directly.
That's not a bug, i think, but the way strokes are handled: The width of a stroke is never used for clipping, only the area. In your picture the starting point and endpoint are connected to get the area (closed vector path) and this is used for the clipping mask.
If you want to use this shape as mask you need to create the vector outline first.
I still think this is incorrect behaviour, and the stroke should be able to be used as a clipping layer. It works in Photoshop that way as well: patterned strokes also work in PS.
/*---------------------------------------------*/
System: Win10 64bit - i7 920@3.6Ghz, p6t Deluxe v1, 48gb (6x8gb RipjawsX), Nvidia GTX1080 8GB, Revodrive X2 240gb, e-mu 1820, 2XSamsung SA850 (2560*1440) and 1XHP2408H 1920*1200 portrait
System: Win10 64bit - i7 920@3.6Ghz, p6t Deluxe v1, 48gb (6x8gb RipjawsX), Nvidia GTX1080 8GB, Revodrive X2 240gb, e-mu 1820, 2XSamsung SA850 (2560*1440) and 1XHP2408H 1920*1200 portrait
-
Herbert123
- Mitglied
- Beiträge: 2172
- Registriert: Sa 12 Mai 2012 21:38
Re: Neue Testversion 19.40b4
Apologies, one more thing:
The color editor panel ought to keep the colour model intact when a colour is selected in the bottom part. Currently the colour is converted to RGB at all times, unless the user sticks to the sliders at the top. This is confusing. if I want to keep it CMYK, I cannot use the bottom part of the color editor, only the sliders.
The colours in the bottom part should ideally also adapt to the chosen colour model: when CMYK is selected, the bottom part can then display those possible colours.
/*---------------------------------------------*/
System: Win10 64bit - i7 920@3.6Ghz, p6t Deluxe v1, 48gb (6x8gb RipjawsX), Nvidia GTX1080 8GB, Revodrive X2 240gb, e-mu 1820, 2XSamsung SA850 (2560*1440) and 1XHP2408H 1920*1200 portrait
System: Win10 64bit - i7 920@3.6Ghz, p6t Deluxe v1, 48gb (6x8gb RipjawsX), Nvidia GTX1080 8GB, Revodrive X2 240gb, e-mu 1820, 2XSamsung SA850 (2560*1440) and 1XHP2408H 1920*1200 portrait
-
Eurgail
- Mitglied
- Beiträge: 379
- Registriert: So 06 Jul 2014 23:02
Re: Neue Testversion 19.40b4
I don't know how to create such a thing (a stroke with variable width) in Photoshop, but in Illustrator you can find the same behaviour as in PhotoLine. Perhaps your wish is good feature request, however in any case there is no bug.Herbert123 hat geschrieben:I still think this is incorrect behaviour, and the stroke should be able to be used as a clipping layer. It works in Photoshop that way as well: patterned strokes also work in PS.
-
photoken

- Mitglied
- Beiträge: 2162
- Registriert: Sa 28 Sep 2013 01:25
Prob: Color Editor always reverts to RGB
I agree. The behavior of the small Color Editor window that is accessed by double-clicking on the F/B icons in the Toolbar correctly keeps the selected colour model at all times. The "big" Color Editor should behave the same.Herbert123 hat geschrieben: The color editor panel ought to keep the colour model intact when a colour is selected in the bottom part. Currently the colour is converted to RGB at all times, unless the user sticks to the sliders at the top.
Added:
This is a previously reported problem that still remains to be fixed:
http://www.pl32.com/forum3/viewtopic.ph ... tor#p33332
I've changed the title of this thread to "Problem" so I can track this issue.
Ken
Yes, I think it can be eeeeeasily done....
Just take everything out on Highway 61.
Yes, I think it can be eeeeeasily done....
Just take everything out on Highway 61.
-
Herbert123
- Mitglied
- Beiträge: 2172
- Registriert: Sa 12 Mai 2012 21:38
Re: Neue Testversion 19.40b4
In the web export dialog, selecting JPEG2000 crashes Photoline.
/*---------------------------------------------*/
System: Win10 64bit - i7 920@3.6Ghz, p6t Deluxe v1, 48gb (6x8gb RipjawsX), Nvidia GTX1080 8GB, Revodrive X2 240gb, e-mu 1820, 2XSamsung SA850 (2560*1440) and 1XHP2408H 1920*1200 portrait
System: Win10 64bit - i7 920@3.6Ghz, p6t Deluxe v1, 48gb (6x8gb RipjawsX), Nvidia GTX1080 8GB, Revodrive X2 240gb, e-mu 1820, 2XSamsung SA850 (2560*1440) and 1XHP2408H 1920*1200 portrait
-
Gerhard Huber

- Entwickler

- Beiträge: 4145
- Registriert: Mo 18 Nov 2002 15:30
- Wohnort: Bad Gögging
Re: Neue Testversion 19.40b4
not here. Do I need a special kind of picture?Herbert123 hat geschrieben:In the web export dialog, selecting JPEG2000 crashes Photoline.
-
Herbert123
- Mitglied
- Beiträge: 2172
- Registriert: Sa 12 Mai 2012 21:38
Re: Neue Testversion 19.40b4
Strange, it does for me - most images crash Photoline the instant I try to web export a JPEG2000Gerhard Huber hat geschrieben:not here. Do I need a special kind of picture?Herbert123 hat geschrieben:In the web export dialog, selecting JPEG2000 crashes Photoline.
/*---------------------------------------------*/
System: Win10 64bit - i7 920@3.6Ghz, p6t Deluxe v1, 48gb (6x8gb RipjawsX), Nvidia GTX1080 8GB, Revodrive X2 240gb, e-mu 1820, 2XSamsung SA850 (2560*1440) and 1XHP2408H 1920*1200 portrait
System: Win10 64bit - i7 920@3.6Ghz, p6t Deluxe v1, 48gb (6x8gb RipjawsX), Nvidia GTX1080 8GB, Revodrive X2 240gb, e-mu 1820, 2XSamsung SA850 (2560*1440) and 1XHP2408H 1920*1200 portrait
-
photoken
- Mitglied
- Beiträge: 2162
- Registriert: Sa 28 Sep 2013 01:25
Re: Neue Testversion 19.40b4
Works fine here, too. All images -- JPG, PNG, TIF, PLD, PSD, AI, and various RAW formats -- have no problems. Original sizes ranged up to >30Mb.Herbert123 hat geschrieben: Strange, it does for me - most images crash Photoline the instant I try to web export a JPEG2000
Added:
I found a way to cause a crash -- choosing the "Add sRGB profile" option. New problem report filed on this.
Zuletzt geändert von photoken am Di 04 Aug 2015 00:23, insgesamt 1-mal geändert.
Ken
Yes, I think it can be eeeeeasily done....
Just take everything out on Highway 61.
Yes, I think it can be eeeeeasily done....
Just take everything out on Highway 61.
-
photoken
- Mitglied
- Beiträge: 2162
- Registriert: Sa 28 Sep 2013 01:25
Prob: "Add sRGB profile" Web Export JPG2000 crashes PL
Win7 x64 SP1
PL 19.40b4 x64
When using the Web Export, and specifying "JPEG 2000" as the format, selecting the "Add sRGB profile" option in the lower left corner crashes PL.
Steps to reproduce
PL crashes.
Expected result
Well, no crash....
PL 19.40b4 x64
When using the Web Export, and specifying "JPEG 2000" as the format, selecting the "Add sRGB profile" option in the lower left corner crashes PL.
Steps to reproduce
- Open any image.
- Choose Web...Web Export.
- Select "JPEG 2000" as the export format.
- Select the "Add sRGB profile" option.
PL crashes.
Expected result
Well, no crash....
Ken
Yes, I think it can be eeeeeasily done....
Just take everything out on Highway 61.
Yes, I think it can be eeeeeasily done....
Just take everything out on Highway 61.
-
Herbert123
- Mitglied
- Beiträge: 2172
- Registriert: Sa 12 Mai 2012 21:38
Re: Prob: "Add sRGB profile" Web Export JPG2000 crashes PL
Confirmed, the Add sRGB Profile option crashes Photoline.
/*---------------------------------------------*/
System: Win10 64bit - i7 920@3.6Ghz, p6t Deluxe v1, 48gb (6x8gb RipjawsX), Nvidia GTX1080 8GB, Revodrive X2 240gb, e-mu 1820, 2XSamsung SA850 (2560*1440) and 1XHP2408H 1920*1200 portrait
System: Win10 64bit - i7 920@3.6Ghz, p6t Deluxe v1, 48gb (6x8gb RipjawsX), Nvidia GTX1080 8GB, Revodrive X2 240gb, e-mu 1820, 2XSamsung SA850 (2560*1440) and 1XHP2408H 1920*1200 portrait
-
Herbert123
- Mitglied
- Beiträge: 2172
- Registriert: Sa 12 Mai 2012 21:38
Re: Neue Testversion 19.40b4
Small request: I am currently creating a bunch of game characters in Photoline, and I noticed that when I change the rotation points of groups and objects, and I save and close the files, the next time I open those files the rotation points have been reset to the center once more.
That is quite annoying, since I am forced to painstakingly move the rotation points all over again for each character when I continue to work with them.
As an example of how frustrating this is, imagine having set the rotation points for four legs, a tail, a head, eyes, and other elements, in order to create a new version. Then after saving and closing the files, I have to set all those rotation points ONCE AGAIN, because Photoline does not save that information in the .pld files.
Now multiply this by 18 (18 characters), and multiple sessions for different versions as well!!! You can imagine the lost time and effort...
Please oh please could you make sure that Photoline saves custom rotation points?
/*---------------------------------------------*/
System: Win10 64bit - i7 920@3.6Ghz, p6t Deluxe v1, 48gb (6x8gb RipjawsX), Nvidia GTX1080 8GB, Revodrive X2 240gb, e-mu 1820, 2XSamsung SA850 (2560*1440) and 1XHP2408H 1920*1200 portrait
System: Win10 64bit - i7 920@3.6Ghz, p6t Deluxe v1, 48gb (6x8gb RipjawsX), Nvidia GTX1080 8GB, Revodrive X2 240gb, e-mu 1820, 2XSamsung SA850 (2560*1440) and 1XHP2408H 1920*1200 portrait